Resolving Merge Conflicts (GitHub): A Step-by-Step Guide 🛠️
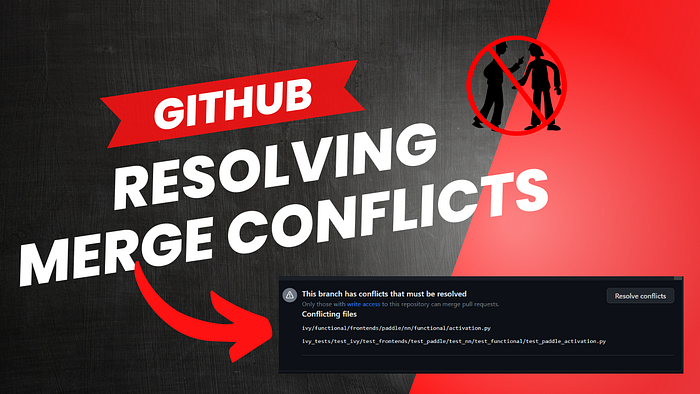
Table of Contents-
- What is a merge conflict ? 🤔
- How to resolve the merge conflict ? 🎯
- Alternate way ?😕
- Connect with me! ❤️
1. What is a merge conflict ? 🤔
Consider you opened a pull request on GitHub for a particular issue, for an organization/project. By opening a PR, a new page is opened where you can see your PR, some CI tests, assigned person who will be your reviewer for the PR, etc.
You will also see below the tests checks mentioned ‘This branch has no conflicts with the base branch’.
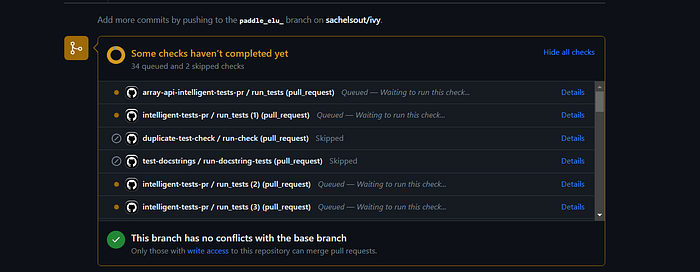
It means, the changes you have done in your branch can be merged successfully into the main/master branch of the project you are working on.
Now consider, you visited this PR page a while later (some time/days/months later), you see this…
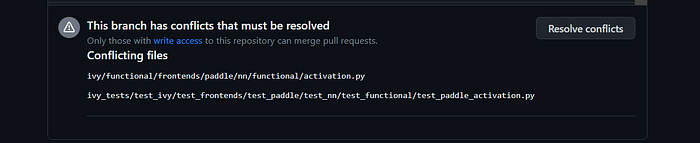
This above message is Merge Conflict. It means, while you have raised a PR for some particular file/files, other people have raised PRs too for same file/files (might be working on other issues which belong to same file/files), and their PRs got accepted and merged first. This updated code/docs of theirs does not reflect in your code/docs file/files, as you’ve worked earlier.
Therefore, it’ll raise merge conflicts and you will need to resolve these conflicts to merge your PR.
Resolving merge conflicts is simply, updating your branch with the latest code/docs from base branch of the project, which will be beneficial to merge your PR without any conflicts.
2. How to resolve the merge conflict ? 🎯
When you see such below conflict message in your PR page/tab, you will need to resolve merge conflicts (your reviewer will ask anyway 😂).
Following is a step-by-step explanation in order to resolve merge conflicts of your PR ⬇️
NOTE- Here, I am using GitHub’s codespace to resolve merge conflicts. You might be using VSCode locally, different OS, etc. This will work nevertheless. If not, do comment here, we will figure it out 😊
- Sync your forked repository of the project first, open codespace and then open Terminal. Checkout(change) to main/master branch using the following command.
git checkout master2. Pull the updated code from the base branch of the project using below command. This command will make your forked repo’s master branch updated with the latest changes/commits of the base branch of the project.
git pull3. Now checkout to the branch which is associated with the PR, facing merge conflicts. I was facing merge conflicts with the PR which is associated with the branch named paddle_elu_.
Following is the command to do this. Simply replace the paddle_elu_ with you branch’s name.
git checkout paddle_elu_4. After checking out to a required branch, merge the branch with the latest code pulled from the base branch of the project, using below command.
git merge master5. After you merge the branch with the latest code from the master branch, open the file/files which are mentioned in the merge conflicts message of your PR. You can also see those files at the left section of your IDE, mentioned in red color. Open such files.
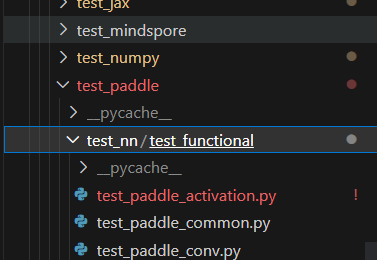
6. After opening these files, you will see some code snippets in them with different colors and one blue button named ‘Resolve In Merge Editor’.

7. Click on that button. A new file will open which will be similar to the existing file on which you clicked that button. This file is the place where you will merge the code (accept or reject the latest code commit of others, also accept or reject your code as well).
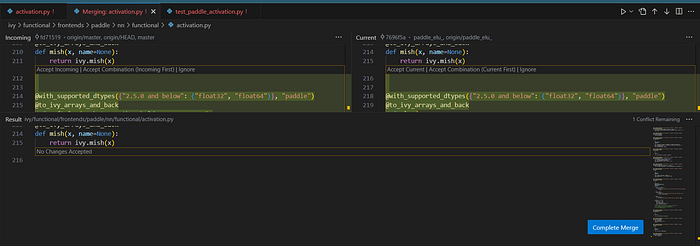
Click on ‘Accept Incoming’ and ‘Accept Current’. This will add both the code snippets into the resultant file. Then click on blue button named ‘Complete Merge’. Do the same for other files which are mentioned in your PR page as well, which needs merging the latest code.
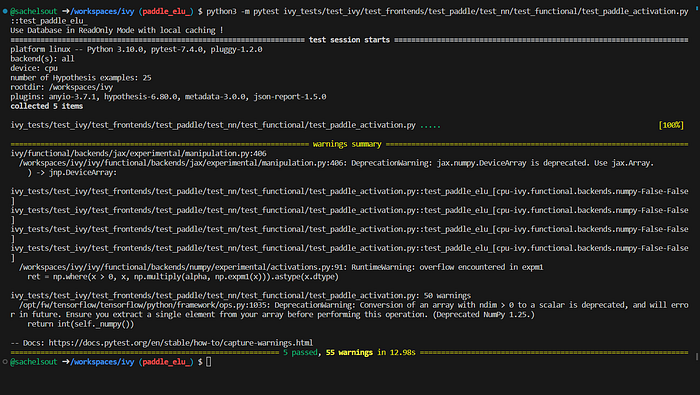
8. After merging the code, its always a code practice to test your code with the test cases you’ve written. Reason behind doing so- it might happen that the project made code changes with the versions of any libraries. Then you will need to make changes in your code so that the tests passes successfully even after any libraries’ version changes.
Example :- A particular function you used in your code mentions the version ‘2.4.2 and below’ and now the project is running on latest ‘2.5.0 and below’. You will need to make the version change in your function. Otherwise the tests will fail locally as well as during CI checks on GitHub.
So I tested my function after merging process and all the test cases are passing !! 😍 Time to push these changes in the paddle_elu_ branch.
9. Add all the files (modified files, new files if any after merging with base branch), commit with a message and push those files to the paddle_elu_ branch.
a) Adding all the files.
git add -Ab) Commit using a message. You can write any message you want, but better be relevant message. 😅
git commit -m "resolved merge conflicts"Note- If you are using pre-commit hooks, make sure all the hooks are passed successfully. If not, make relevant code changes and add, commit again. Repeat the process till all the hooks are passed. Otherwise it will get noticed/flagged during CI checks on GitHub. 😰
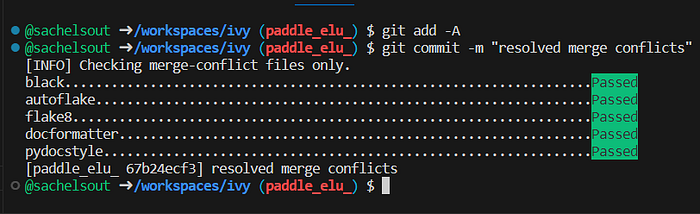
c) Push the changes done. Replace paddle_elu_ with your branch name.
git push origin paddle_elu_10 . After you push the code to your branch, you will see a message below CI checks, on PR page as ‘This branch has no conflicts with base branch’.
Hooray !!!🥳 The Merge Conflicts are resolved !!!
3. Alternate way ?😕
Ok, so there is an another way to resolve these merge conflicts, and we can do that in GitHub itself. But when I tried doing that, I found it to be a little confusing and above given method seemed easier than this way.
I’ll just explain the steps on how to do it 😄 It’s your call, which method to follow.
- Click on ‘Resolve conflicts’ button.
2. After clicking the button, you will be directed to a new page given below.
Here, you can see the files in which you need to make changes, the code associated with those files, highlighted code to be changed (add/remove code) and a button named ‘Mark as resolved’.
Here I got confused on exactly how we can make changes in the code. I found the code to be jumbled. But if you are able to make changes successfully, its good right !😍 After making changes press the button ‘Mark as resolved’.
Repeat the same for remaining files as well.

3. After resolving all the conflicts, click on the button named ‘Commit merge’ and that’s it.

4. Connect with me! ❤️
📚 That’s a wrap on my technical blog! If you have any questions or need further clarification on the topics covered, feel free to reach out to me. I’m here to help!
If you’re looking for a talented technical writer, I’m available for hire. Let’s collaborate and bring your ideas to life! 😊